Mexican Lasagna

This is a repost of a recipe I put on here 2 years ago! (I can't believe this blog is that old!) It is a family favorite but I never remember to take pictures. Super easy, a kid favorite and if there are leftovers, it reheats well. Plus, it can be made ahead and frozen. My kind of meal!

*See variations at the bottom of post
from a card at a grocery store
1 ½ lbs lean ground beef
1 pkg Taco Seasoning -I just do ½ pkg otherwise it can be a little too spicy
1 tsp Lawry’s Seasoned salt
1 cup diced tomatoes, fresh or canned
1 can (15 oz.) tomato sauce
½ of a 4oz can of diced green chiles
–I put the other half in a Ziploc bag and freeze it for later. It works really well.
1 cup ricotta cheese – I use cottage cheese
2 eggs, beaten
10 corn tortillas
2 ½ cups (10 oz.) grated Monterey jack cheese –I just use whatever cheese I have

**Note: the pictures are of a 1/2 batch. It makes just the right amount for my little family of 4. You could make a whole batch in 2 different pans and freeze one for another time.
In a large skillet, brown ground beef, stirring until cooked through; drain fat. Add taco seasoning mix, seasoned salt, tomatoes, tomato sauce and chiles; blend well. (I leave out the chiles because my two little kids don't like the spice. But before we had kids, the chiles were in and they're great!) Bring to a boil. Reduce heat; simmer, uncovered, 10 minutes.
In small bowl, combine ricotta cheese and eggs. (You can leave the eggs out and just do the ricotta/cottage cheese. You'll just need a little more. I don't even measure anymore... I just make sure the tortillas are covered sufficiently.)
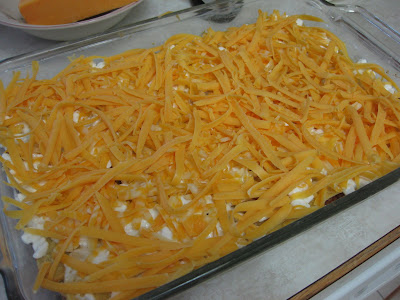
In bottom of 13x9x2 inch baking dish, spread ½ of meat mixture.Top with ½ of tortillas;spread ½ of ricotta cheese mixture over tortillasand top with ½ of grated cheese.Repeat layering, ending with grated cheese.Bake, uncovered, in 350 oven 20-30 minutes or until hot and bubbly. Let stand 10 minutes before cutting into squares. I know it isn't pretty, it all got eaten before I got a picture! And after this picture, it was ALL GONE!
Variation:
For a half batch, I used 1lb hamburger, NO taco seasoning, 1/2 tsp Lawry's, ONE 14.5oz can diced tomatoes with chipotle chiles, 8oz tomato sauce, NO green chiles, NO eggs, cottage cheese, and extra thin corn tortillas. I liked it really well. Very easy having the tomatoes and chiles mixed together. It was the perfect spicy-ness for my family without losing any flavor. I liked the thinner tortillas and it didn't overwhelm the dish at all like some tortillas have in the past. Very good. Will probably do it this way from now on!

Related Posts:

Teriyaki Rice Bowls

One night my husband and I wanted something different for dinner. I suggested teriyaki. He suggested steak and this is what we came up with. He did a great job cooking the meat. I think it might be his job from now on! ;) I'll stick with the rice on this one. It's hard to screw up rice!

This teriyaki sauce is so versatile. We use it for chicken. We use it for beef. But one night I wanted a rice bowl. It hadn't crossed my mind to use it for the beef for that! It was super simple and way yummy! And it could just have easily had chicken if you're not a beef person.

Teriyaki Sauce (click for recipe)

2 lbs steak cut up into pieces

Veggies (we did just carrots this time but next time we'll do carrots, broccoli, onions, peppers, asparagus, and snow peas)

Long Grain Rice

Cook steak in a small enough pan so that the juices don't cook out. Add veggies and allow them to get soft and cooked in the meat juices. Add teriyaki sauce and cook until sauce is about half cooked out (gone into the steak and veggies).

Cook rice as desired. Serve over rice and enjoy!

Note: You can marinate the meat in half of the sauce (reserving the other half for when you cook it). For me, it worked to just cook it all in the pan together. But if you want a more subdued teriyaki flavor, marinate it, taste the meat when it is cooked and decide if you want to add the remaining reserved sauce. Don't worry, the sauce keeps well in the fridge for awhile.

Related Posts:

Tuscan Chicken

from Joni

1 lb boneless skinless chicken cut into 1 inch pieces
2 cans italian stewed tomatoes, undrained
1 can red kidney beans
1 can tomato sauce
1 cup water
1 jar sliced mushrooms
1 med green bell pepper, chopped
1/2 cup chopped onion
1/2 cup chopped celery
4 cloves of garlic, minced
1 tsp Italian seasoning
6 oz thin spaghetti, broken in half

Add all ingredients except pasta. Put in crockpot on low 4 hours or until veggies are tender.

Stir in noodles. Cook on high 10 min, stir. Cover and cook 35 minutes or until pasta is tender.

Related Posts:

Quickie BBQ Chicken Pizza

I realize this is hardly a recipe. But we've enjoyed making them so much I figured I might as well post them on the blog.

This is a great recipe to use left over chicken. Plus, it is a nice for a quick lunch for the kids or a snack after school. I think they'd even be okay for a casual appetizer with friends.

Chicken, cooked and shredded
BBQ Sauce
Grated cheese
Tortillas (these were the small size)

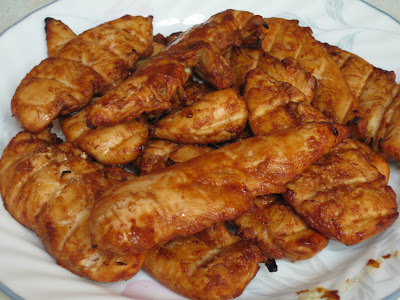
Cook chicken. Shred it. Pour BBQ sauce over it until it has the desired amount. Place tortillas on a rack and place under HI broil for 1 minute (or a little less) on each side. This helps them to dry out a little bit so the chicken doesn't make them dough.

Remove from oven and spread chicken over the tortilla. Sprinkle cheese over top.Broil on HI for about 2 minutes or until cheese is bubbly and entirely melted.
Cut into triangles and serve!

Related Posts:

Turkey Meatballs

from Kelly

l lb ground turkey
1/2 cup bread crumbs
1/4 cup milk
3/4 tsp salt
1/2 tsp worcestershire
1/4 tsp pepper
1/2 cup chopped onions
1 egg

Mix with hands, roll. Fry them until cooked through. Place in pan.

Sauce:
1/2 package of onion soup mix
1 can cream of mushroom
fill can 3/4 full of milk

Whisk together, pour over meatballs, cover and put in the oven for 60 min at 350.

Related Posts:

Firehouse BBQ Grilled Chicken


I first saw this recipe on Real Mom Kitchen's blog. She found it on Picky Palate. My family loves this chicken. I had to reduce the Frank's hot sauce to 2 tbsp for my small children. (Three tbsp to 1/4 cup is just right for my husband and I.) After making it several times, I realized I hadn't posted it to our recipe blog. And since this blog is used as a portable recipe box for family and friends, it needs to be on here. Hope you enjoy it as much as we do.

14+ thawed boneless skinless chicken tenders (you can use breasts, they just take longer to cook)
2 Tbsp - 1/4 cup Frank’s Red Hot Sauce
3/4 cup of your favorite BBQ sauce
4 Tbsp melted butter
2 Tbsp Worcestershire sauce

Place all ingredients in a large Ziploc bag and marinate for one to two hours.If you are not grilling these outside, HI broil works great, too. Line a cookie sheet with foil. Place cooling racks over the foil. Place chicken across the racks. DISCARD the marinade!Broil chicken for about 5 or 6 minutes on each side, turn over and repeat. The tenders cook fast so this can be done in about 10 minutes.Super simple. Super fast. My kind of dinner!

Related Posts:

Sour Cream Waffles


These waffles are so easy. They cook up great every time. They're the perfect texture. And I've never had complaints from the kids when I make them.
from "Back to the Table" by Art Smith
1 3/4 cups all purpose flour
1 tablespoon sugar
1 tablespoon baking powder
1/2 tsp salt
1 cube butter, melted
1 cup milk (if desired, add a little more to help thin the batter)
1/2 cup sour cream
3 large eggs

Combine dry ingredients in a large bowl to combine and make a well in the middle. Mix wet ingredients in a medium bowl until well combined and pour into well. I use my Pampered Chef whisk for this. But you can use a mixer, too. Just be careful not to over mix it.

Pour onto hot waffle iron. I like to use my belgian waffle. Cook until golden and enjoy!

Related Posts:

Chicken Stir Fry

Courtesy of Allrecipes.com
This recipe is very yummy and passed onto me from my Sister-in-Law Amy.

I don't do this recipe exactly like the website since it was too much for my family, so here is my version and you can put in the vegetables that you prefer. You could do this with a frozen bag of veggies... but fresh is SO much better!


Chicken and marinade
2 medium-large boneless skinless chicken breast halves
3 tablespoons cornstarch
2 tablespoons soy sauce
1/2 teaspoon ground ginger
1/4 teaspoon garlic powder

Other Ingredients
3 tablespoons cooking oil, divided
1 1/2-2 cups broccoli florets
1/2 c snow peas
10 asparagus with 2-3 inches of bottoms cut off
1/4 c onion sliced (I do mine big enough to find them and take them out for the kids)
1/4-1/2 cup thinly sliced carrots
1/2 cup water
1/2 teaspoon chicken bouillon granules
1 tablespoon Soy Sauce
1/4 teaspoon ginger
1/8 teaspoon garlic powder
1/2 teaspoon cornstarch

Directions

1.Cut chicken into 1/2-in. strips; place in a resealable plastic bag or bowl with lid. Add cornstarch and toss to coat. Combine soy sauce, ginger and garlic powder; add to bag (or bowl) and mix/shake well. Refrigerate for 30 minutes.

2.In a large skillet or wok, heat 2 tablespoons of oil; stir-fry chicken on a medium heat until no longer pink, about 3-5 minutes. Remove and keep warm. Don't be alarmed if the bottom is coated with the cornstarch and marinade... it will come off later and coat the veggies.

Add remaining oil; on medium heat, stir- fry broccoli, asparagus, carrots and onion for 4-5 minutes or until crisp-tender then add the pea pods because they cook faster than the other veggies. Mix water and bouillon and add to the veggies (this softens the buildup on the bottom of the pan and it thickens and coats the food). Reduce heat to medium low or low heat. Return chicken to pan. Mix the soy sauce, ginger, and garlic again with the cornstarch and pour over the chicken and veggies. Cook and stir until thickened and well coated. You can put the lid on to help your veggies to cook through a little bit more, you don't want them to be too limp, but not too crunchy either.

Serve over rice. *I like it with Brown Rice which you will need to start before you begin cooking the chicken since it takes 45 minutes to cook brown rice*
Note: I have tried it with bell peppers before and it was good, but I like this combo of veggies the best of all the ways I have tried it! The asparagus really is quite good for those of you that are hesitant... my kids LOVE LOVE LOVE it! Surprisingly enough! ;)

Related Posts:

Memphis Dry Rub Ribs

from Renee

2 racks baby back ribs (4 to 5 pounds)

For the rub:
2 tablespoons paprika
1 tablespoon black pepper
1 tablespoon dark brown sugar
1 1/2 teaspoons salt
1 1/2 teaspoons celery salt
1 teaspoon garlic powder
1 teaspoon dry mustard
1 teaspoon cumin
1/4 teaspoon cayenne pepper

Wash the ribs and blot dry. Remove the thin papery skin on the back of each rack of ribs. (Pull it off in a sheet with your fingers, using a corner of a dish towel to gain a secure grip.)
Combine the ingredients for the rub (the paprika, black pepper, sugar, salt, celery salt, cayenne, garlic powder, mustard, and cumin) in mixing bowl and stir with your fingers to mix. Rub 2/3 of this mixture on the ribs on both sides. Transfer the ribs to a roasting pan and let marinate for at least 4 hours, preferably overnight. Cover cookie sheet with tin foil and place on pan. Bake at 350 oven for 2-3 hours. Enjoy with your favorite BBQ sauce!

Related Posts:

Cream Cheese Chicken and Vegetable Soup


I found this recipe at Mel's Kitchen Cafe while I was looking at her cornbread recipe. (Also very yummy!) The soup has cream cheese in it and I said to myself...."If it has cream cheese in it, it can't be bad." ;) In short, my family LOVED it. It makes a good size batch and I barely had 1 bowl leftover. It was nice that I always have all the ingredients on hand. It will definitely be going on our list of favorite soups.

2 TBSP butter
2 TBSP minced onions (can use yellow onion, but I prefer dry minced)
2 cloves garlic, finely minced
2 stalks celery, finely diced
1/2 cup diced carrots (I used my ones I freeze each fall)
3 cups chicken broth
2-3 potatoes (Mel suggests leaving the peels on the reds if you use them)
1 cup milk
4 tablespoons flour
1 (8 oz. package) cream cheese (light can be used)
About 1 pound boneless, skinless chicken breasts, cooked and diced (I seasoned with salt & pepper also)
Salt and pepper (I had to add about 1 tsp+ after it was all done)

In a large pot, melt the butter and add the onion, garlic, celery and carrots. Saute, stirring often, for 3-4 minutes, until the veggies are slightly tender and the onions are translucent. Add the chicken broth and potatoes. Bring the soup to a simmer and cook, partially covered, until the potatoes are tender, about 10 minutes. In a liquid measuring cup, vigorously whisk the flour and milk together until smooth. Whisk the mixture into the soup, stirring quickly, and cook over medium heat for 3-4 minutes, until the soup begins to thicken slightly. Stir often to ensure the soup doesn’t burn. Soften the cream cheese in the microwave until it is very soft/melty. I usually place the unwrapped cream cheese on a plate and microwave it for one minute at 30% power. I like it really, really soft so it doesn’t leave lumps in the soup. Add the cream cheese to the soup in small tablespoon-size pieces. Let the pieces sit in the soup and warm through then whisk or stir the soup until the cream cheese melts and mixes in well. Add the cooked chicken and heat through. Season with salt and pepper. Serve.

Related Posts:

Beef Fajitas


We were craving fajitas one night, but we didn't have a seasoning packet. I turned to the internet and I found this homemade seasoning recipe. I cannot even find it again. It was in really random place. But I had all the ingredients on hand for it, so it is the one I used. And boy it did not disappoint.

We used homemade salsa and fresh tortillas (the kind you heat up on the skillet yourself). They really contributed to a restaurant-style fajita. I doubt I can eat a regular tortilla again. Mmmmmm...... What a fabulous meal it was! Just thinking about it again makes my mouth water. ;)

Fajita Seasoning1 1/2 teaspoon Cumin
1/2 teaspoon Oregano
1/4 teaspoon Salt
1/4 teaspoon Red pepper
1/4 teaspoon Black pepper
1/8 teaspoon Garlic powder
1/8 teaspoon Onion powder
2 Tbsp juice from a fresh lime
Small Dash of worcestershire

Cut steak into fajita strips. Pour seasoning over steak in a ziploc bag. Zip bag and rub seasoning all over meat. We didn't let it marinate. We didn't have time. We just cooked it. But it worked out just fine. You can add peppers and onions if desired. We cooked the onions in a separate pan to caramelize. Once the steak is cooked, pour off the juices and continue cooking steak to "dry it out" a little (not really dry, but not soggy meat pieces). Serve with desired toppings.

Related Posts:

Hashbrown Pie

This is a re-post of a much much older post. I finally took a picture of it. It is difficult to get a good picture of any casserole, but oh-well. The taste is great. It is an all-in-one dish meal & always a kid and husband favorite. We're not huge casserole fans, but on busy nights, this dish is easy to throw together.

from a cookbook at a bed & breakfast in Utah

1 bg frozen hashbrowns
1 lb browned hamburger
1 can corn
1 can cream of chicken soup
1 can cream of mushroom soup
½ cup sour cream
½ pkg Lipton Onion Soup
Shredded Cheddar Cheese

Put about 1” of hashbrowns in bottom of greased 9 x 13 casserole dish. You can do more. I’ve just found that 1” to 1 ½” works well. That way the layers are even. Brown hamburger with Lipton Onion Soup and a dash of pepper. Layer hamburger on top of hashbrowns. Add corn. Combine soups & sour cream. Pour over corn. Sprinkle with cheese. Cover with foil. Bake at 350º for 45 to 60 min. Let sit a few minutes before serving.

Lo-fat tip: Use ground turkey and yogurt sour cream.

Related Posts:

Corn Bread


I've been looking for a good corn bread recipe for a long time now. I found this last year and we've been making it ever since. However, I didn't realize it wasn't on the blog until somebody asked me for the recipe. This is where I found the recipe. I love this recipe blog and have made several recipes from her site.

½ cup cornmeal
1 ½ cup flour
2/3 cup sugar
1 tablespoon baking powder
½ teaspoon salt
1/3 cup oil
3 tablespoons butter, melted
2 eggs, beaten
1 ¼ cup milk

Add dry ingredients, make a well and add oil, butter, eggs, and milk into the center. Stir until just mixed (batter will be runny – don’t be alarmed!). Bake in an 8” square pan at 350 degrees for 35 minutes. (This doubles perfectly for a 9X13-inch pan.) I prefer to make an 8" pan for just my family, but if I am taking it somewhere, I either make 2 - 8" pans or I put it in a 9x13. Personally, I think 2 - 8" pans cook better.

Honey Butter:
2 sticks butter, softened
1/2 cup honey
1/2 cup marshmallow fluff

Whip all together with an electric mixer and serve at room temperature (can be refrigerated and softened). This honey butter is so good! Mmmm......

Related Posts:

Sweet Crescent Rolls


5th recipe from Emily
Ingredients:
3/4 cup milk
3/4 cup water
1/2 cup white sugar
1 teaspoon salt
2 eggs
5 teaspoons active dry yeast
5 cups all-­‐purpose flour
1/2 cup margarine, melted

Directions:
1. In a medium saucepan over medium heat, warm milk, water, sugar and salt. Remove from heat, and mix in the eggs and yeast.

2. Measure flour into a large bowl. Make a well in the flour, and pour milk mixture into it. Do not stir. Cover with a lid, and let stand for 20 to 30 minutes.

3. Pour melted margarine into flour, and mix well. Add more flour if too sticky. Knead lightly. Cover, and let rise for 20 to 30 minutes.

4. Shape the dough into crescent roll shape and place a little bit of butter in the middle before you roll it. Place on a baking sheet. Let rise again for 20 to 30 minutes.

5. Bake rolls in a preheated 400 degrees F oven for 15 minutes, or until done.

Approximate Prep Time: 20 minutes
Approximate Cooking Time: 70 minutes (rise and cook time)

Related Posts:

Snickerdoodle Cookies

I got this recipe from a lady in my community. I had one of these cookies at an open house and couldn't stop eating them! Had to have the recipe! So glad she shared! Here's a link to her recipe blog. She's got great stuff on there. We'll definitely be trying out some of her recipes.

The great thing about these cookies is that they aren't flat like all other snickerdoodle cookies I've had. They "stand up." They're super soft and so good!

In a medium bowl, combine 1/2 cup sugar and 2 tsp ground cinnamon...

Preheat your oven to 350 degrees.

In a large mixing bowl, combine:
1 cup butter, softened
2 1/2 cups sugar

Beat until light and fluffy.

Add:
4 eggs
1 teaspoon vanilla
2 1/2 Tbsp water

Beat until combined.

Add:
6 cups flour
2 tsp cream of tartar
1 tsp baking soda
1/2 tsp salt

Mix well.

Shape dough by rounded tablespoonfuls. You can do them any size. (I made mine larger sized and baked for 11 minutes. I got 8 cookies to a pan.) Drop dough in cinnamon sugar mixture and roll around to coat the ball of dough. (I prefer to use a ziploc bag and shake!) Place on a cookie sheet. I use parchment paper. Bake 10-12 minutes or until they are golden brown. Cool on a wire rack. If there are any left, store in a tight container.

Related Posts:

Crispy Southwest Chicken Burrito


I got the idea for our crispy burritos here. I tweaked it to fit our family. We've made them several times now & changed one thing here or there. And they've been amazing every time. Hope you enjoy them, too.

This recipe made 12 burritos total. We made up as many as we needed the first day and then used the leftover ingredients for more the next day.

Ingredients:
Chicken, cooked & shredded (instructions below)
1 can Mexican RoTel (it has lime & cilantro)
1/2 pkg Taco Bell taco seasoning
1 pkg Knorr Rice Sides Spanish Rice
1 can black beans, drained and rinsed well
Uncooked tortillas, as many as you need for your family
Shredded cheese
Sour Cream
1 can Green Chile Enchilada Sauce
-----
Directions.........

In crockpot:
2 lbs chicken (I use mine from frozen)
1 can Mexican RoTel
A little water to cover the bottom of the crockpot

Cook on high for 3 hours.
Do not drain the juices. Push the rotel into the crockpot and remove chicken. Shred chicken with forks and return to crockpot. I always add about a 1/2 pkt of Taco Bell taco seasoning and stir until all the chicken is coated. Put the lid on and let the crockpot "keep it warm."

On the stovetop:
Cook 1 pkt of Knorr Rice Sides Spanish Rice according to pkg directions. Let sit when it is done. It's okay if it cools off a little.

On the griddle:
Heat griddle to 400. Cook tortillas according to pkg directions. It is usually about 30 seconds on each side. Ours are from Costco and are Tortilla Land brand. I can cook 2 at a time on our griddle. Don't turn off the griddle. You're going to use it soon to "crisp" the burritos. Keep it at 400 degrees.

Now it is time to build the burrito. Place the tortilla on a plate. Starting at the bottom of the tortilla, add:
spoonful of rice
spoonful of chicken
few dollops of sour cream
spoonful of black beans
Sprinkle with shredded cheese

Carefully wrap it up and place seam side down on the griddle. Once that side is "crisped," rotate to the back side, and continue with the remaining 2 sides.

I can do quite a few burritos at a time on the griddle. I just build the other burritos while the others are "crisping."

Serve hot with green chile sauce on the side. We use a spoon and drizzle it on!

I couldn't get a good picture of a cross section of these and didn't think about it until they had cooled off. But this gives you an idea....

Related Posts:

Pioneer Woman's Homemade Chicken Strips


This is a "copycat recipe" for sure. I love Pioneer Woman's recipes and have made many of them. I haven't posted all of the ones I've used, but I use this blog as my portable recipe box..... So this recipe must be on here! They were so good. So easy. And a super hit!

1 pkg chicken strips (I used tenderloins and cut them into strips)
Buttermilk (can use egg, milk, cream)
1 1/2 cup flour
2 1/2 tsp Lawry's seasoning salt
Vegetable oil

In a frying pan or skillet, pour enough oil so there is about 1 inch of oil. Preheat on medium heat.
If using tenders or strips, place them in a bowl with desired liquid (buttermilk, cream, milk, or egg). If using tenderloins or breasts, cut them into thin strips and proceed in the same step. Allow chicken to sit in liquid for at least 20 minutes. I didn't have buttermilk on hand (which is what Pioneer Woman suggests), but the cream worked well for me, too.
In a bowl, mix flour and seasoning. Carefully drizzle about 1/4+ cup of liquid, while gently stirring with a fork. This will create little crumbles of crunchy goodness later.
When oil is sufficiently hot, take a pieces at a time out of the liquid and roll chicken around in the flour mixture.Place carefully into oil. Cook until brown on each side. They don't take long at all.As each strip gets done, place on paper towl to cool.

Serve as an appetizer, main dish, on salad, in a wrap, or just for a snack!

Related Posts:

Roasted Red Potatoes


I realize this probably isn't anything new to anyone out there. And it isn't new to us either, but I've had people ask how we do this and I figured it was time to post it on the blog. This is about the easiest thing to do with red potatoes. A little olive oil, some seasoning, and the oven. I originally posted a recipe for cottage potatoes that is similar to this, and we do those potatoes with olive oil now as well. Much healthier and the flavor is awesome! (Just a note, you can do the same with zucchini and it is great! It takes a little less time to cook is all.)

Red potatoes
Olive Oil
Seasoning (There are a ton of different seasonings out there. Ours is a herbed parmesan mix)

Cut up red potatoes. I usually do them in quarters. In a bowl toss, potatoes, olive oil, and seasoning. I drizzle the olive oil 2 or 3 times in a circle, toss it and check to see if it is coated. You don't want to overcoat but you don't want to undercoat it or they won't cook well. Sprinkle seasoning over top and stir until covered and you have the desired amount covering all the potatoes. A little goes a long ways. It is more of a live & learn thing for how much seasoning is just right. But I'd say about a tablespoon is close for us. Maybe a little more or less depending on how many potatoes you have. We usually have a lot of potatoes.

Spread potatoes over cookie sheet lined with parchment paper. You can do it without, and it makes one side a little crunchier, but the parchment makes it so much easier to take the potatoes off without scraping. Plus, you're pan is cleaner, too. :)

Bake at 450 for 35 minutes.

We like it with bbq chicken, but it is great with any entree!

Related Posts:

Sunshine Jello Salad


I originally found this recipe about 2 years ago and have loved it. It is perfect to take to family gatherings and there's almost never anything leftover. It's a great salad to take for funerals, too. My kids love it. I only changed 1 thing -leaving out the pineapple- from the original recipe, but left everything else. It is easy and always a crowd pleaser.

1 (6 oz.) orange Jell-o2 cups boiling water

1 cup mandarin orange and pineapple juice, reserved from the canned fruit

1 (6 oz) frozen orange juice concentrate

1 (3.4 oz) lemon pudding mix

1 (8 oz) carton of whipped topping

1 (20 oz)can pineapple tidbits, drained reserving juice (I don't use the pineapple, just the juice)

1 small can mandarin orange (I think these are like 8 or 10 oz), drained reserving juice
Mix boiling water and jello together for 2 minutes. Mix in frozen orange juice concentrate until dissolved. Mix in reserved 1 cup mandarin orange and pineapple juice. Add fruit. (If you don't include the pineapple like I do, you can use 2 cans of mandarin oranges so there are more oranges. I prefer to just use the pineapple in something else & take the juice and only use 1 can of oranges. I've never had any complaints.)
Put in a 9 x 13 dish and refrigerate until set. So that the oranges are well distributed throughout the salad, I carefully take a spoon and arrange the oranges in the pan. I usually do this while it is sitting in the fridge. Otherwise, when you move it from the counter to the fridge, all your "hard work" is out the window. ;)

Make pudding according to package directions. Pour over set jello and refrigerate for 5 min.

Drop whipped topping in several mounds on top of pudding layer and carefully spread. Look at those beautiful layers!

Note: I usually make this a day ahead. However, I do the jello part the night before and let it set up overnight. I also make the pudding and put it in a bowl. The morning of, I just take a paper towel and dab any water droplets from the jello if there is any. Then, just before I take it, I put all the layers together. It has seemed to be the most smooth process for transport and freshness.

Related Posts:

Aunt Lettie's Lemon Cake


I FINALLY got a picture of this yummy cake. So this is a re-post of an older post. The picture doesn't do it justice. I have take this cake to MANY a community/school/family function and have yet to not be asked for the recipe. It's that good. It is so simple. Totally my style!

from Aunt Lettie
-this was a family staple at family reunions and many family gatherings... so yummy

3/4 cup oil
4 eggs
3/4 cup water
1 small pkg (3 oz) lemon jell-o

Blend in blender. Add yellow cake mix. (Lemon can be used if desired). Blend until mixed well. Pour into greased/floured 9x13 pan. Bake for 30 minutes at 350. Poke cake all over with fork while cake is still hot.

Mix 1/2 cup lemon juice (I just use the ReaLemon concentrated stuff) and 2 cups powdered sugar. If you want your cake less juicy, half the lemon juice and powdered sugar. Pour over cake. And let cake cool completely.
It was near impossible to get a good picture of this cake. It is good the first day, but the second day, it is AWESOME!

Related Posts:

Raspberry Trifle


I had this dessert at a baby shower and literally couldn't stop eating it. It was amazing. Should have known the secret was homemade custard! My friend was kind enough to share the recipe and took a picture of the beautiful layers as well. As great as the picture is, it doesn't do it justice. The flavor is so good and you'll find yourself licking the bowl to get the last bit of custard! ;)


from Renée
This recipe is by French Canadian cook Jean Paré
Ingredients:
1 White cake mix, 2 layer size
Raspberry Jam

Custard:
2 2/3 cup Milk
1/4 cup custard powder (Birds Eye... see link below)
1/4 cup sugar
1/3 cup Milk
3/4 tsp vanilla

1 Pkg. 15 oz frozen raspberries in syrup, thawed, syrup reserved

Whipped Cream
1 cup whipping cream
1 tbsp sugar
1/2 tsp vanilla

Make cake mix according to directions on box using 2- 8 inch round cake pans. Cool completely. Slice cake layers in half horizontally to make 2 thin layers each. Spread 2 layers with 1/4 cup jam each. Cut all 4 layers into cubes.

To make Custard:
Heat 2 2/3 cups milk in heavy saucepan on low heat until it simmers. (This is a slow process. Do not heat on high heat or it will burn your milk)

Stir custard powder and sugar together well in a small bowl. Mix in 1/3 cup milk and vanilla. Stir slowly into hot milk until mixture boils and thickens. Cool completely.

To Make Trifle:
Drain syrup from raspberries in bowl and reserve.

Spread 1/2 the cake cubes in bottom of 2 quart glass bowl. Pour 1/2 the raspberry syrup over the cubes. Sprinkle with 1/2 the raspberries. Spread 1/2 the custard over raspberries. Repeat with remaining cake cubes, syrup, raspberries and custard. Chill until cold.

Whipping Cream:
Beat cream, sugar and vanilla in small bowl until stiff. Spread over top layer of custard.

Enjoy!!

Servings 6-8

*Note: Birds Eyes Custard Powder is a British/Canadian Product. I have not been able to find it in the grocery stores in States. But you can order it online at this website:

http://www.britishfooddepot.com/Birds-Custard-Powder-300g-240.htm
Or through amazon.com
http://www.amazon.com/Birds-Custard-Powder-300g/dp/B000JMBE7C/ref=sr_1_1?ie=UTF8&qid=1327110695&sr=8-1

*You can substitute vanilla pudding for the custard but it definitely does not compare to a homemade custard!! :)

Related Posts:

Chicken Pot Pie


I am reposting the recipe because it has been on the blog for over 2 years and I took some new pictures. Plus, I've found making individual pot pies rather than 1 big one helps them cook better.


Crust:
Click here for the recipe. I just used the dough from a previous batch and let them thaw all day to room temperature.

Roll out one crust and place it in the bottom of 9 inch pie dish. Roll out top crust and leave until your filling is done.

Chicken:
2 chicken breasts, thawed
Salt and pepper

Place chicken in glass baking dish and sprinkle with salt & pepper. Cover with foil. Bake chicken at 350 for about 40-45 minutes or until done. Cut up all veggies while chicken is cooking. After chicken is done, put chicken on cutting board to cool. After it is cooled, cut up into desired chunks. (Note: I've found that baking the chicken keeps it much more moist than boiling it. If you don't care, then just boil it or for even quicker cooking time, cook it in a George Foreman grill and sprinkle with the salt & pepper. This takes about 15 minutes but it's a little crisper on the edges.)

Filling:
1 1/2 cups water
1 1/2 Tbsp chicken soup base
1 cup potatoes, cubed to desired size
1/3 cup carrots, chopped to desired size
3 Tbsp celery, chopped into itty bitty pieces
A couple shakes of dried minced onion

Individual foil pie dishes
(Recipe makes 5)

Boil all veggies until they are still firm, but close to done. If needed, add more water if the veggies are absorbing a lot of the water. Add 3 Tbsp to 1/4 cup cream of chicken soup. Add more chicken soup base if needed to taste. Add salt -if needed- and pepper to taste. Stir in until blended, with a taste check afterward, of course! :) (If you want your pie more runny/juicy add a little extra soup/water.) Let cool slightly. Add in chicken and pour into pie dishes. I buy the foil individual pie dishes. They come in a pack of 6. I just reuse them and wash them in the dishwasher! Super easy. The pies cook better as individual rather than one big one.

Put top crust on top and flute the edges. With a sharp knife, cut about 4 slits in the center to let steam escape.


Bake at 425 for 15 minutes. Lower oven temperature to 350 and cook for an additional 10 minutes or less... just until golden brown. (I got mine a little too golden this time... as you can see in the picture.) Maybe a little foil around the edges? I've done that for other pies, so I guess it would work for this, too.
Let set up for about 5 minutes and then serve.
Note: You could do other veggies if desired. I'm not a pea or green bean person so I opted for potatoes, celery, and carrots. If you do peas, cook them separately and throw them in at the end with the chicken. I guess you could do frozen veggies, but I've found that fresh tastes soooooo much better. It's worth all the effort to cut it all up and have it taste so yummy.

Related Posts:

Applesauce Cookies


from Jean

I got this great recipe from my neighbor. My husband LOVES these cookies. They nearly disappeared before I got a picture! I won't lie, they aren't the prettiest cookies. They're not your typical rolling out or roll-into-balls cookies. But they are flavorful and you won't be disappointed.

Cream together:
1 cup shortening
2 eggs
1 1/2 cups sugar

Mix together:
2 cups applesauce
1 tsp soda

Add:
1 tsp cloves
1 tsp cinnamon
1 tsp salt
1 tsp nutmeg
4 cups flour

Mix all together. If desired, add nuts or raisins or chocolate chips. We prefer not to put anything in it. We just like a light frosting on top. I will say that chocolate frosting on these cookies is best. I thought a regular cream cheese would be best, but the chocolate balances out the flavors and the cloves perfectly. Find the recipe here. The chocolate recipe is at the bottom of the post.

Drop by spoonfuls onto cookie sheet. I haven't needed to grease the cookie sheet. This recipe makes about 4 dozen depending on the size of your spoonfuls. Mine made 3 1/2 dozen but my cookies could have been a little smaller.

Bake at 400 for 10 minutes. I promise, you don't want longer than 10 minutes. :) Cool and frost lightly with chocolate frosting. These aren't like sugar cookies where you go crazy with the frosting. ;) A little goes a long ways. I didn't thin my frosting down. I think the consistency was fine with the regular recipe.

Related Posts:

Rolo Pretzel Turtles

My kids LOVED helping with this recipe. It was super easy and they taste great.

I'm not going to lie. This isn't a new concept. The recipe is all over the internet and on the back of the Rolo bag. But, since I use this blog as my portable recipe box, it needs to be on here!

Pretzels (we used the Snyders snaps, they are square and not butter flavored)
1 bag of Rolos, unwrapped
Pecan halves (or you can use almonds, cashews, red & green m&ms)

Recipe makes about 50 turtles, depending on how many Rolos are in the bag.

First, you need to toast the pecans. At 350, toast the pecans on a cookie sheet for 4 minutes. Stir them around and toast another 4 minutes.

Meanwhile, place all the pretzels -salt side down is my preference (it's prettier)- on a cookie sheet lined with parchment. Kids loved this part, too. Then place all the Rolos, fat side down, in the center of each pretzel. Bake at 350 for 3 minutes. Remove and immediately place a pecan in the center and press down gently. Not too hard or the caramel oozes out. If you don't like pecans, use an M&M, almond, cashew, even Reese's pieces candy. Let cool.

Related Posts: